Pages

Showing posts with label DCWV. Show all posts

February 1, 2018

Sparkly Bettie Bow

Hi, it is that time of the month again over at the 

This month our challenge is Digistamps4Joy and I have to tell
you I had never heard of them till they came to be our sponsor.
There is pages and pages of images to chose from, make sure you
go check them out.

So here is my project using the Bettie Bow image, she is
just so sweet.

I wanted to do something a bit sassy so I chose some bold
colors.  I love the combination of red & turquoise.   I knew I wanted
red and something, I tossed around yellow or blue in my head but I
am glad I decided on this combination.
I colored her using my Copic markers and then add some sparkle
to the bows with my SpectrumNoir Sparkle pen, unfortunately,
 it does not show up in the picture.  I stamped a Penny Black sentiment
using Catherine Poolers ink called "All that Jazz" and then heat embossed it with sparkle embossing powder on the circle die cuts.  I then cut out the image using a wonky stitched die and mounted it on to red & turquoise paper which
I distressed the edges.  The base of the card are papers from an
old DCWV pack. 

Thank you for stopping by and visiting my blog, make sure you go
and play along with the 

August 16, 2017

Sunflowers in a Jar

Hi, this card was made following the sketch this week at
Tuesday Morning Sketches, I love to play along here when I can.

Here is the sketch.

I flipped it sideways so I could fit my sunflower image that came
in this months Unity Kit of the Month.

I stamped the image onto kraft card stock and colored it using my
Polychromo pencils.  The sentiment is an Altenew stamp.
I loved the place paper and thought it would pull all my colors together,
it is from a DCWV stack a few years back called Autumn Amber.

Thanks for stopping to take a peek at my blog.
Challenges entered:
Tuesday Morning Sketches - sketch - ends 8/20
Power Poppy - hues to use - no ending
Through the Craftroom Door - anything goes - ends 8/22
Tuesday Throwdown - anything goes - ends 8/22

March 7, 2017

Mojo Monday #487

Hi, I have a quick card to share today following the
sketch over at Mojo Monday this week. 
Since it is the 1st Monday of the month they offer a 
$25 gift certificate to Verve Stamps.
This was a fun sketch to work with, in fact, I may make another one.
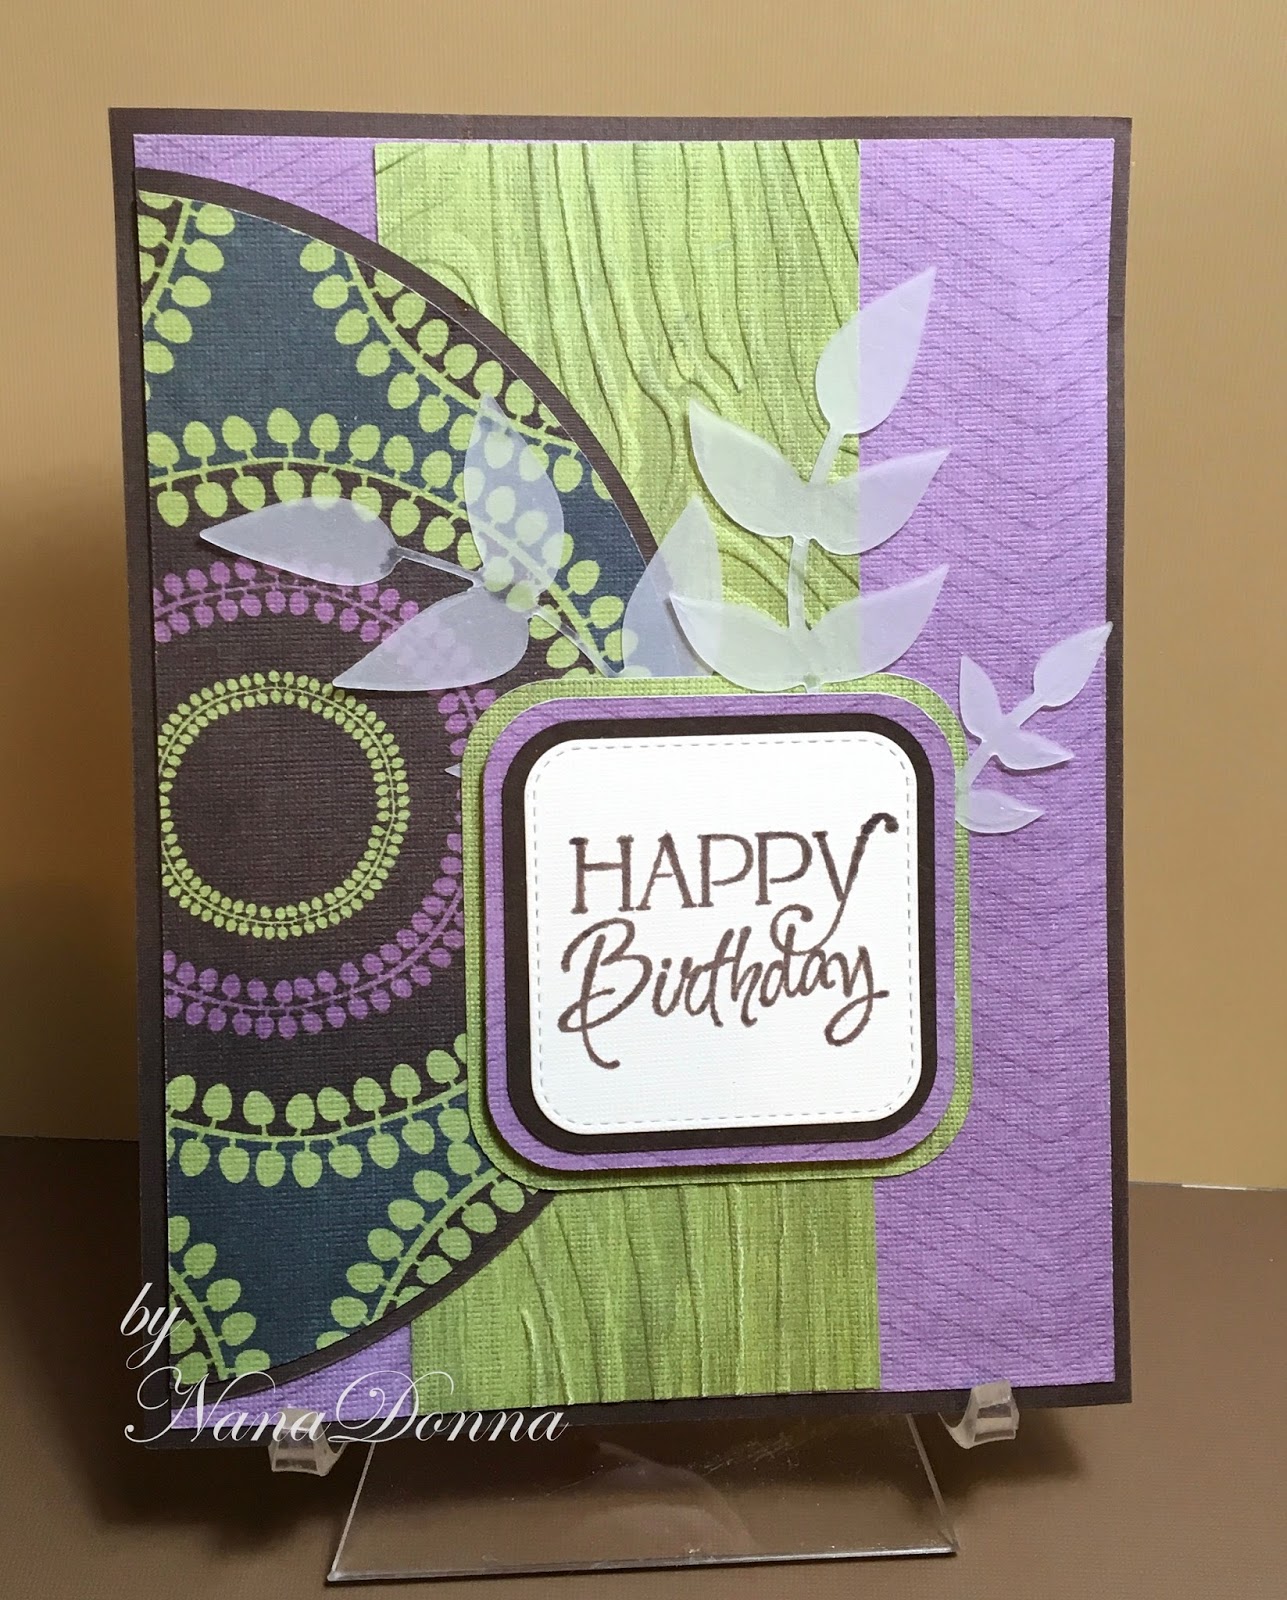
The papers I used are from a DCWV paper stack from 2009, might have 
been one of my first paper stacks, although I have been making cards since 1996.
I embossed the center panel with a "woodgrain" embossing folder.
The foliage is a die that I got in my last Stamp of Approval box.
The happy birthday is a Verve stamp that I have had for years 
and is one of my favorite happy birthday stamps, love the mix of cursive and
block lettering.
Well that's it, thanks for stopping by.

August 19, 2016

Eek! A Mummy

Hello, here is a card I made using this week
Friday Freebie over at Scrapper's Delights.


This card was super easy and quick to put together thanks to the piece
of background paper from the DCWV Halloween and Fall stack I got a few years ago.  Hard to see but I colored her using Copic markers, her face is colored but doesn't show up too well in this picture.
Be sure and head on over to Scrapper's Delights and pick up your image.  It is a progressive challenge over at Scrapper's Delights challenge blog. 
Thanks for stopping by.

Challenges entered:
Colour Crazy - Anything goes with a hand colored image end 9/2
Creative Fingers - Anything goes ends 9/2
Pattie's Creations - Anything goes with a digi or stamp ends 9/1

March 13, 2014

Mojo Monday #336

I have a card to share with you today that follows the sketch this week at 
A while back I bought the DCWV Chalkboard stack, I love the chalkboard look with fonts on it. 
So finally I used some of it to create this card.
 I used my Cameo and white gel pen to write the birthday wishes on a piece of the red chalkboard paper.  It has a very rough feel to it much like a chalkboard.  I then triple cut layers around it.
The houndstooth background paper is from the DCWV Natural stack, then I embossed the red with my houndstooth folder.  I added some velvet like ribbon and a CTMH embellishment.
Thanks so much for stopping by, hope you have a wonderful day.

May 29, 2013

Teal & Purple Combination

Hi I made it back with two posts in one week!  Yeah!

I love this color combination, I think the teal and purple look so pretty together.
I hand cut all the square so that they would all line up correctly.  The papers are from a DCWV paper stack.  I cut out ovals and stamped it using a Gina K stamp, then added some crumbled ribbon that I laid flat.
This is a 4 by 9 card and fir into a #10 business envelope.

I am glad you stopped by, I would love to read your comments.
 

May 1, 2011

Birdcage Card

I had brought the Cricut cartridge Straight From the Nest a while back, it has a lot of nice features on it especially the corner feature.  I had not used it in a while but when the sketches came out at RAQ's Challenge this week on the Cricut message board, I went straight to this cartridge.  If you have a Cricut and your are looking for some inspiration or just have fun stop by and join in, there is a bunch of great ladies there.  I will tell you that I feel like my card making has improved ten fold since I started to do these challenges a year or two ago.  We love new people.

On to my card, the sketch sample had a birdcage on it and I knew I had the Mariposa DCWV stack that would go well with a birdcage cut, my problem was picking which paper from this beautiful stack.
  The card measures 4 x 8 inches, which if a fun size to work with, the only thing is I had to make an envelope to fit it.  Business size 10 envelope is a bit too long.  The birdcage is cut at about 2 3/4 inches and has 3 layers, a shadow, the cage and another layer that is part of the cage area, oh and of course the bird :).  The entire birdcage was cut from white cardstock.  The red part I colored using Distressed Ink Fired Brick and then sprayed it with Scarlet Glimmer Mist.  The shadow I sprayed with charcoal Glimmer Mist and the bird I inked it yellow, sprayed it with Glimmer Mist and then covered it with Glossy Accents.  I love Glimmer Mist, as you can tell so this has a lot of subtle shimmer.
The top layer of the cage kind of rolled slightly when I sprayed it so that is was the shape of a dome, which was kind of cool.  I cut the bar part across the opening (the bar the bird sits on) then when I glued that piece on top I glued just along the edges so it looks 3D and set the bird inside on the perch, oh yeah that is what that thing is called.  LOL

I "hung" the birdcage from a piece of gold chain like cord.  The corners were also cut from Straight From the Nest out of white and sprayed with the charcoal.  The happy birthday is actually a sticker, brackets around the sentiment were cut from Alphallious cartridge.   I struggled with what sentiment to use, I was going to make it a sympathy card to have it one hand but it just did not look right to me, so a birthday card is always safe and will always get used.
 I also linked this card up to Make-it-Monday  challenge, where every Monday there is an anything goes challenge.
Well I am so glad you came and checked out my blog, I would love to read your comment.

January 30, 2011

Oh so Pretty Poppies!

I think I had to pick a favorite flower it would be Poppies, I just love the simplicity of them and the bright colors.  I made this card using one of the images from Tiffany Doodles, I just love her images and she just redid her store, check it out if you like digital images.  I made this card to enter into the monthly challenge blog at Tiffany Doddles Blog, kind of nice to do a monthly challenge as it gives you more time to create, she even gives away some of her images each month.  Also this week at Stamptacular Sunday Challenge the theme is "WHATEVA" which is so much fun and I thought this digital stamped image was perfect!
My Mom also loves poppies and her birthday is coming up so I made this for her.  It was made over several days, she comes and spends the winter with us from Colorado so I always had to have two things going and every time she came in my room I had to hide it and pull out the other card, LOL..........I colored the poppies using my Promarkers, using the colors Poppy and Bright Orange and blended them together.  The leaves were also colored using Promakers.  The background paper is from the DCWV Crafty stack.  The cream colored strip on the left side is pearl paper that I embossed using of the the Cuttlebug embossing folders that comes in the Asian set.

The largest poppy I colored twice and cut one of and pop dotted it over the top of the other one to give it a little depth.  I think image would make a fabulous "spotlight" card, I may have to try that soon.  Happy Birthday is a Gina K stamp that I heat embossed using a pearl orange powder.
Thanks so much for visiting my blog and leave me a comment so I know you stopped by.  I love reading them!

August 28, 2010

Black Currant paper again ----Happy Birthday

This one is similar to the thinking of you card, papers are from the DCWV Black Currant stack, although they look the same they are actually slightly different papers. 

I think this one came out very pretty with the pink glitter.

Let me know what you think.  Which one do you like better?

August 26, 2010

Thinking of you Black Currant paper

Oh I just fell in love with this paper as soon as I seen it.  Actually we were in Joann's one day and my husband found this stack and said "Hey what about this one" and I said OMG yes!  He is real good at helping me find paper. :)
So I made this card using a couple of the papers in the stack.   I actually made this card to send as an entry into the 2010 World Card Making Contest.  Sure hope I win, the prize is over $600 worth of crafting products.

Using my Gypsy I made the frame for the inside of the card by placing a square from George the size of the card and then placing a rounded corner square in the center so that I would have the rounded cut out for the front of the card and not waste either piece.  I should have thought of this years ago, LOL.  The card itself is 6.5" x 5".  The "Thinking of You" is a Stampin Up stamp from the Elegant Greetings set that I bought years ago. 

Now I have seen several people us Terrifically Tacky tape to put a line of glitter on a card but always forgot to do it, but this time I tried it and it came out great and was so easy to do.  I was worried about not getting it straight but it came out pretty good, I used Martha Stewart glitter.  Also below that pink strip is 4 small circles (they are about 1/3 of inch)I cut using my Cricut and then covered them with the same glitter.  They are not very easy to see in the photo.  The little butterfly I got at the fabric remnant store for $1.99 for a pack of 12.  This card is so so pretty in person with just enough shine to it.  Thanks for looking and as always any comments are appreciated.
And here is the inside, the flower is from George, good old George what would we do without it!